In my book, no food is truly ugly. The difference between gorgeous, magazine-spread ready food photography and Martha Stewart’s forays into the genre is a food stylist and professional lighting. Still, even I have to admit that some dishes are natural lookers.
One of the prettiest recipes I’ve seen in recent memory is this Hasselback butternut squash from Bon Appétit. The written recipe is straightforward, but watching Carla Lalli Music make it kinda turned me off the whole idea. Butternut squash isn’t my favorite to start with, and neatly cutting one in half is a huge pain in the ass. Plus, you have to peel it, and the whole process takes almost two hours. But damn it, it’s so pretty, and the flavors are right up my alley. Determined to investigate the worthiness of a Hasselback-ed winter squash without wrangling a Butternut, I swapped in an unpeeled Delicata and spiked the glaze with miso and soy for good measure.
Does this technique do anything besides look pretty? Yes, it does—the thin slices don’t readily separate, so most of the flesh steams in its own juices, absorbing any glaze that makes it between the slices. This technique ensures just the outer parts of the flesh are suffused with glaze, so you get a little bit of everything in each bite: candied skin, buttery, miso-y flesh, and lots of pure squash flavor to round it all out. If you chopped up the squash, tossed it with the glaze, and threw it in the oven, the sugars would burn before the squash cooked through; if you slathered the interior with glaze and roasted it flesh side-up, the ratio of glaze to squash would be insufficient. This is the rare fancy technique that’s both easier than it looks—slicing the par-cooked squash took me maybe three minutes per half—and completely worth a little extra fussing. If you’re in the market for a beautiful, festive, easily-veganized main dish, look no further.
Sweet and Spicy Miso-Glazed Hasselback Delicata Squash
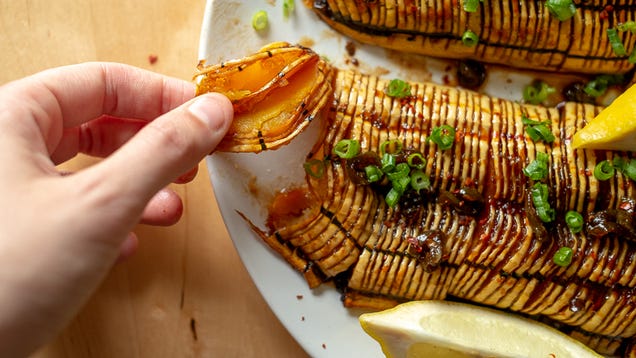
Photo: A.A. Newton
Do not attempt to Hassel any backs (or Hoffs) without a very sharp knife and some sort of offset spatula. A flexible fish spatula is probably the “correct” tool here, but I used a burger-flipper type that worked great. If you don’t plan on peeling your squash, be sure to reduce the glaze until it’s downright syrupy—the thicker the glaze, the more easily it’ll cling to squash skin. Sliding a few bay leaves in the sliced squash makes for a gorgeous presentation and an aromatic flavor boost, but they’re not essential. My bay leaves came from the bodega across the street, and as such, taste mostly of dust. I left them out and wouldn’t change a thing.
Ingredients:
- 1 medium delicata squash (mine was just under 1 1/2 pounds)
- 1-2 tablespoons olive, canola, or vegetable oil
- 1/2 teaspoon table salt
- 3 tablespoons butter, salted or unsalted (or coconut oil)
- 1 tablespoon miso paste, red or white
- 2 tablespoons soy sauce or tamari
- 2 tablespoons apple cider vinegar or lemon juice
- 2-3 tablespoons dark brown sugar
- 1 or 2 sliced fresh hot chilies (serrano, Fresno, bird’s eye, jalapeño, or whatever you like)
- (Optional) A handful of bay leaves, curry leaves, or Makrut lime leaves, fresh or dried
Instructions:
Heat your oven to 425ºF and line a baking sheet with parchment paper. You could use oiled aluminum foil, but I strongly recommend parchment. It makes it easy to remove the glaze that drips off and burns.
Use a very sharp knife to halve the squash lengthwise, then scoop out the guts with a spoon. Cut through the stem if you can, but if it’s too tough, finish splitting the squash by bending it against the stem with your hands. It should snap in two.
Place the squash cut side down on the parchment-lined baking sheet, and use your hands to spread the olive oil and salt all over the skin and flesh. Return to the cut side down position, transfer to the preheated oven, and roast for 10 minutes.
This is roughly the doneness you’re looking for on the par-cooking step: a paring knife should slide in about 1/4 inch before meeting resistance. Use a towel or potholder to control the free end, and take your time on the slicing. 1 / 3
Meanwhile, make the glaze. Add the butter, miso paste, soy sauce, vinegar, brown sugar, and chilies to a small saucepan and bring to a boil over medium heat, stirring constantly to dissolve the sugar and miso. Reduce heat to low and simmer until thick and syrupy, about 10 minutes. Taste the glaze a few times as it cooks—once the heat level is to your liking, remove the chilies with a fork or strainer and reserve for later.
Your squash should now be just soft enough to slice without too much trouble. Carefully transfer the hot squash halves, cut side down, to a cutting board. Make thin (1/4 - 1/8 inch) crosswise slices through the skin down the entire length, stopping before your knife hits the board. Stop earlier than you think is necessary, and don’t worry if you accidentally slice all the way through; you can scoot the pieces together later.
Keep at this until you have two beautifully Hasselback-ed squash halves. Slide an offset spatula under the length of the squash, using the flat of your knife to help if needed, and transfer back to the parchment-lined pan. Gently push on the slices to slightly fan them out, slip in the bay leaves if you’re using them, and drizzle or brush a few generous spoonfuls of glaze onto the squash. Return to the oven for 10 minutes.
Repeat this process twice more, adding more glaze every 10 minutes, until the skin is burnished and browned. Some of the glaze will definitely slide off and burn, so remove any black bits before piling on more glaze. If you like, run it under the broiler for a few minutes just before serving to really crisp the skin up.
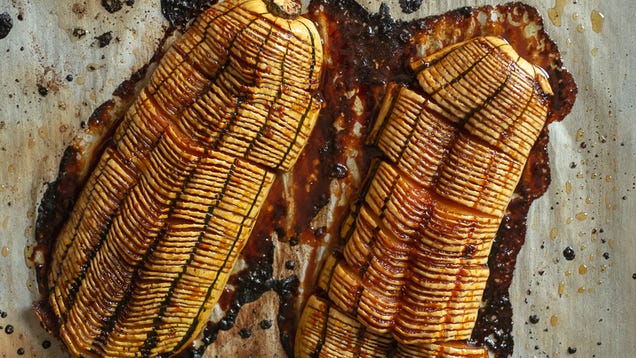
All that burned glaze around the edges will slide right off the parchment.Photo: A.A. Newton
Serve however you like. I opted for sliced scallions and lemon wedges, which added just enough sharpness to balance the squash’s powerful savory-sweetness. If I hadn’t been out of yogurt, I would have made a quick lemony yogurt sauce, spread it over the serving platter, and arranged the squash on top. Really, though, you can’t go wrong. Dressed up or down, this squash is a real showstopper—and I promise it tastes even better than it looks.
This article was written by A.A. Newton on Skillet and shared by A.A. Newton to Lifehacker from Lifehacker and was legally licensed through the NewsCred publisher network. Please direct all licensing questions to legal@newscred.com.